Category Archives: Quilting
Hayl’s Quilting Class: Prelude – Shweshwe Fabric
In the past few months, I’ve done very little other than work, work, work, with a side of housework. While setting up our new house is fun, it’s also been stressful, since my few precious days off are torn between resting/recovering from the week, catching up on grading and lesson planning, obtaining essential furniture and appliances to make our new home functional, and chores/housework/yardwork. (I’m exhausted just typing that!)
All that is to say, I am in desperate need of something fun, creative, and social as a relief from all this work. So I signed up for a quilting class at a local fabric store!
My first class is this afternoon, and later I’ll post about piecing the quilt squares we’ll learn today. But first, I wanted to take a moment to talk about the fabric I’ll be using in my quilt. While in South Africa, I purchased some traditional shweshwe fabric:
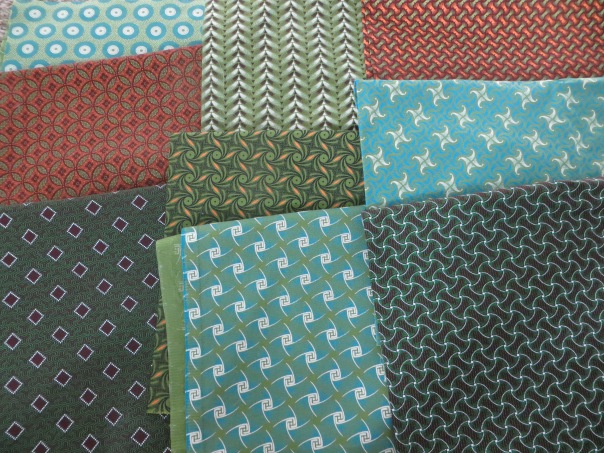
Shweshwe, like most things South African, has a long and complicated history involving the intersection of native cultures (in this case, primarily Xhosa and Sotho cultures) and European colonialism. (A good write-up of the history of the fabric can be found here.)
I purchased shweshwe in new, modern colors – but in the traditional geometric patterns. Before the 1990s, the fabric was only available in blue, as it was originally dyed with indigo, even though a synthetic indigo dye had been used for a century. In the ’80s and ’90s, production of the fabric shifted from Europe (where it had originated in the 18th and 19th centuries) to South Africa. New colors of chocolate brown and bright red were introduced, and new colors like these greens, teals, and oranges have only become available in recent years.
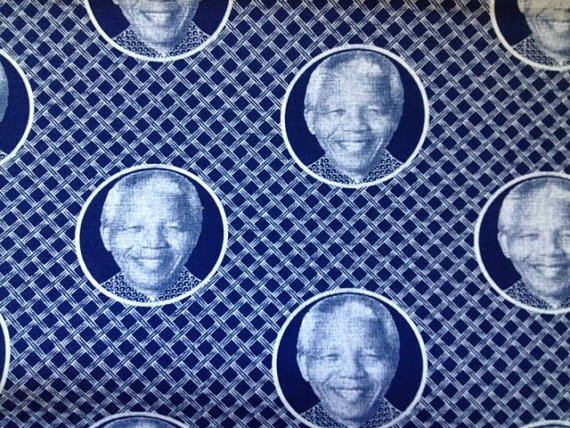
With the end of apartheid in the 1990s came the forging of a new national culture in South Africa, and it seems shweshwe has had a significant role in that. Though its origins are European, today shweshwe is uniquely South African. Da Gama Textiles in Zwelitsha in the Eastern Cape is now the only place in the world where this type of traditionally printed fabric is produced. In South Africa, the fabric is ubiquitous: it is used for dresses, aprons, headwraps, purses, tablecloths, etc. In addition to the traditional geometric designs, a particularly popular fabric is the Nelson Mandela print:
In my quilting class, we will be making a quilt from the book Sister Sampler Quilts by AnneMarie Chany.
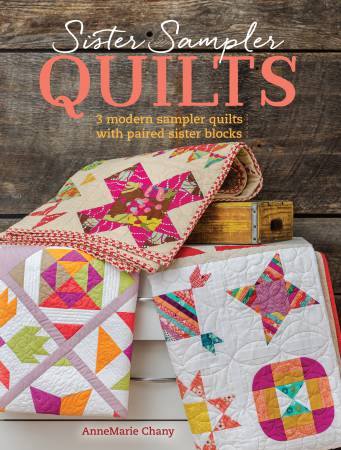
The quilt is described as a “traditional quilt blocks set in a modern quilt.” This description struck me as being perfect for my shweshwe fabric. The art of quilting has always been about connecting history and heritage with the present and the future. Chany says of the quilt I’ll be making: “This quilt’s theme centers around your favorite women.” The blocks all have names like Grandmother’s Frame, Aunt Eliza’s Star, Sister’s Choice, or (my personal favorite) Contrary Wife. Of course, I am inspired to quilt by my mom – and I’ll be using the sewing machine my Granny gave me. Visiting the fabric store with Nora, my mother-in-law, motivated me to sign up for the class in the first place. So of course this quilt will celebrate my favorite women, in addition to celebrating my favorite places in the world through the fabric I’ve chosen. At the same time, I’m making it during a very new stage of my life – our first year in a new state, living in our first house, and in my second year of teaching high school. Both the fabric and the quilt layout are a mix of traditional and new, and that’s right where I need to be right now: holding on to what came before while looking forward.
Hayl’s First Quilt, Step 3: Quilting! And the Finished Product!
When I left off (quite some time ago) from my last post, I had a complete quilt top, and a “quilt sandwich” pinned together, all ready for quilting.
Now came the scary part: it was time to actually learn to quilt. I do not actually recommend learning to quilt the way I did, which was by reading every online tutorial on machine quilting I could find and then just jumping in and trying it. When I next attempt a quilting project, I’m planning to take a Quilting 101 class at a local quilt shop, for some hands-on guidance. Or, if you do want to just dive in, you probably don’t want to begin with free-motion quilting like I did.
So. I started by reading online tutorials like this one, which I kept coming back to. (Maybe I should have started with this one instead, which recommends that beginners start with straight-line quilting.) Before starting with free-motion quilting, I did what is referred to as “stitching in the ditch”–sewing straight lines in the seams of all the squares and sashing. You could, alternatively, free-motion or straight-line quilt the entire piece as one, but I thought it would be easiest to start with quilting each square as its own “unit.”
Both straight-line quilting and free-motion quilting require a different presser foot than the one used for “regular” sewing. I have quite a few different presser feet for my Bernina, but I don’t have a walking foot, which is recommended for straight-line quilting. I do have a darning foot, which is what’s needed for free-motion quilting. The other thing I had to do in order to get my sewing machine ready for quilting was to lower the feed dogs, the bits underneath the fabric that “feed” the fabric through from front to back. I checked my machine’s manual, and this was pretty simple. Now I could sew in any direction–backwards, forwards, diagonally, or any which way–and I was ready to free-motion quilt.
I started with the middle squares, and then did the ones on the right and left. At first, the spacing of my quilting followed almost directly from the size of the owls. I would meander around the owls in the brown fabric, and go sort of randomly all over the place in the other fabrics, like so:

This looked okay, but as I went, I found I was fairly inconsistent with the spacing, and I liked the areas where the quilting was more dense. So I started quilting tighter:

I thought that looked pretty great! But, of course, it meant that I had to back over the squares I’d done with much looser spacing, and try to make the whole thing even. Here’s a before-and-after of one square that I went over a second time:

In case I am making this entire process sound too easy, let me try to fix that. This entire process was hard. It took a long time. I constantly wondered whether my lines were squiggly enough, or too squiggly, or if I was crossing over my thread too many times, or if I was going to completely ruin the entire quilt by screwing up the quilting so bad that I would have to rip out all of the stitching, which by nature of sewing fast with the feed dogs down meant that the stitches were so small that ripping them out would probably destroy the fabric altogether. Plus it took a lot more arm muscle to move the quilt around, despite its small size, than I’d expected. (Yep, despite the fact that all of the tutorials mentioned this. I figured that would only be the case for huge quilts–but I hadn’t thought about the endurance required to do this for several hours in a row. And this took several days of several-hour quilting sessions!)
As my husband Steve can tell you, he sometimes heard a steady stream of curses coming from the craft room throughout this process. Now, in hindsight, there were a few things that could have made this entire process take much less time, and cause much fewer headaches. One would be to not do such dense spacing for the quilting. Since I’ve made this, I’ve been in that local quilt shop I mentioned, and looked closely at the quilting stitches on the display quilts. I haven’t seen anything even close to being as tight as I did here. This would have not only cut the time actually sewing down, but I would have stopped fewer times to wind bobbins, etc. However, it would have required a much better idea from the beginning what I wanted the final product to look like, which I obviously didn’t have. Secondly, I could have put more pins around the edge of the quilt. There were actually several times where I started working somewhere near an edge–only to find that the backing had managed to fold under itself, requiring me to rip out a bunch of stitches and start that area over. And as I mentioned, it’s incredibly hard to rip out such small stitches without tearing holes in the fabric. Finally, I could have chosen a fabric that wouldn’t stand out at all, so the stitches are much less visible–but with the contrasting light and dark colors I had, I’m pretty sure that would require using clear thread, which comes with a load of problems of its own.
Despite all these headaches, by the time I’d finished quilting all of the squares, I was really happy with what I’d created.

My favorite square is in the bottom left, and it was the last one I did, so I had a better idea of what I was doing by that point. For that one, I started with a flower shape in the middle, and continued going around it in an outward spiral for the entire square:

At this point, I was unsure of what to do with the sashing and borders. I’m not an expert, but I think there are two main approaches to take when it comes to quilting and borders. One is to skip the “stitch in the ditch” step around the squares, and just do all-over quilting over the entire quilt, squares and borders alike. I think that’s mostly done with clear thread, though, or with a thread that will mostly blend in with all fabrics in the quilt. Secondly, you can quilt the squares and leave the borders unquilted–but I thought this looked funny with the how densely I did the quilting for the squares. So I decided to quilt in the sashes and borders, which I’d read was an option, but I don’t really recall seeing. The brown thread would stand out the most on the white fabric, but I decided it would look even weirder if I used a second color of thread.
The quilting of the borders is probably the part of the quilt I’m the least happy with it. (Though I’m sure it probably bothers no one else.) This is where, ultimately, I think free-motion quilting and I are not going to get along. I think it looks messy. I don’t like my crafts looking messy.

Fluffy critiques my quilting.
I know I’m my own worst critic, though. And I did have some fun in the borders–I’m not sure if Erin has noticed yet, but because I read a tip about free-motion quilting that said if you don’t know what to do next, to make letter shapes, there are some Easter eggs hidden in there 🙂
Finally, all that was left to do was to trim the excess batting and bottom layer, and sew on the quilt binding:
 And, at long last, the quilt was FINISHED!!!

And it was all TOTALLY WORTH IT when, in April, the birthday girl opened up her present:

Evee with her mom & aunts on her birthday:

These are my girls!
Hayl’s First Quilt, Step 2: Sashing and Borders
When I left off from my last post, I had six complete quilt blocks for Evee’s baby quilt:

The next step in completing the quilt top was to add sashing and borders. Quilt sashing is simply the term for borders around individual quilt blocks. Actually, when I first envisioned this quilt, I thought I would make it without any sashing, which is totally fine–it would have given the quilt more of a patchwork feel. But when I had completed my quilt blocks and laid them out like this, I immediately got the sense that I needed a contrasting fabric to really make the colors pop. Despite the bright colors in the fabrics I’d used, the quilt seemed too dark–so I wanted to get something lighter.
So back to Jo-Ann Fabrics I went, with a couple of the quilt blocks in tow to compare colors. I chose a white fabric with a print that had some coordinating colors, and also got a little bit of a print with the same bluey-teal and pink colors. I apparently failed to take any pictures of the completed quilt top before the quilt was assembled & quilted, but once all of the sashing was added, this is what it looked like:

First I decided on a width for the sashing (remember to add 1/2″ for both seam allowances). I cut strips of the white fabric: eight strips that were the same length as the length of the quilt blocks, and nine that were the same length as the width of the quilt blocks. (Of course, if your quilt blocks are actually squares, then these would all be the same length!) I also cut twelve squares of the corresponding fabric that were the same width as the sashing strips to go in all the corners & intersections.
I doubt that the order of assembly matters very much for a quilt this small, but Best Quilting Practices are to assemble the quilt in rows. This quilt only has two rows, so first I sewed the sashing between the quilt blocks in the rows (the seams are indicated by the black dashed lines in the picture below).

Then I made the three horizontal rows of sashing (sewing the seams indicated in yellow). Finally, I put it all together by sewing along the red lines.

Of course, Fluffy helped!
At this point, it’s pretty common to do a final border around the entire outside of the quilt top, but I decided not to.
The next step was to put together the quilt sandwich. I had purchased batting and some coordinating baby fleece for the back. When I put them together, the fleece I had for the backing was pretty much exactly the same dimensions as the quilt top. However, all of the quilting tutorials I looked at said that the back should have a few extra inches all around, to give a little leeway while quilting. After doing a little more research, I decided to use a pretty common trick to extend a quilt back (or simply to make the quilt back a little more interesting, especially if it’s a larger quilt when a seam is absolutely necessary due to the width fabric comes in). I cut the fleece in four sections, making one cut longways on the fleece, and the other cut perpendicular to that. Then I sewed some of the extra fabric from the front to add a few inches in each direction:

This picture was taken after the entire quilt was finished, but you get the idea.
I really like the effect that made!
Now with a back that was the appropriate size, I assembled the quilt sandwich and used safety pins to hold all three layers together. I started pinning in the middle of the quilt, and placed pins in the center of each quilt block and at regular intervals around the sashing. Later, when I was in the middle of doing the actual quilting, I added more safety pins around the outer edge, because I kept making the mistake of catching the back folded over underneath, and then it was a HUGE pain to rip out a seam of tiny quilting stitches to fix it! But I’m getting ahead of myself–I’ll talk about doing the actual machine quilting in my next, final post in this series.
Hayl’s First Quilt, Step 1: The Nine-Patch Square

About a week after Erin informed me that she was pregnant, I was in Jo-Ann Fabrics to pick up something-or-other. And, not being able to contain my excitement, I made sure I browsed through the baby fabrics while I was there.
That’s when I spotted it. Adorable, wide-eyed baby owls on a brown background. I hesitated for only about ten seconds–there sure was a lot of bright pink in those owls, and it was way too soon to know whether the baby was a boy or a girl. But I definitely don’t believe that pink is a “girl color”–colors are for everyone, right? I picked out two coordinating fabrics–a stripey one with browns and pinks and oranges (and blue and green…)–all the same colors as the owl print–and a bluey-teal with little brown polka dots.
(And I know there are things like logic and confirmation bias and all that, and I also know that I really don’t buy into the whole blue/pink boy/girl dichotomy, but on two other occasions, I’ve purchased blue yarn to crochet baby blankets of babies who turned out to be boys, and now some small part of me that ignores all of that knowledge and also common sense is convinced that I have a craft-material-purchasing prediction-of-babies’-sexes superpower.)
Ahem. Anyway, I fully intended to make a baby quilt by the time Evee was born. Instead, I worked it on and off over a year and a half, and gave it to her on her first birthday. Sometimes, that’s the way it goes with craft projects. (Who am I kidding–sometimes?? Try “most times.”) Which worked out great, actually, because Aunt Ash gave Evee a turtle quilt for her baby shower, and you’ve got to spread out the adorable-animal-quilts-handmade-by-aunties over as long of a time period as possible, because the implosion caused by an overload of too much adorableness all at one time can seriously rupture the space-time continuum.
Because of how much Laura Ingalls Wilder I read as a child, I always knew that the first quilt I made would be made up of nine-patch quilt blocks. This is a super-easy quilt block that’s perfect a beginner, especially because it can be done without any pattern and with only the most basic tools: you can get by with just a ruler (or small cutting mat) and fabric scissors, if you don’t have anything fancier. (A cutting mat and rotary cutter make the job MUCH easier, but I still get by without!) There are many tutorials out there for how to make a nine-patch quilt block, but all you really have to do is sew nine squares together to make one larger square. However, I used the strip method (which my mom taught me YEARS ago, on my first aborted attempt at making “my first quilt” as a teenager).
What I did first was for each pair of quilt blocks, I took two of the fabrics and cut three strips of each of them like this:

The added measurements are for seam allowances. I’ve described the measurements very precisely here, but I am actually pretty sure that I was quite a bit off with one of them when I cut my strips. You’ll see the effect of that imprecision at that end.
Then I took the 6 strips and sewed them into two squares like this:
 Then you simply cut both of those squares in thirds, perpendicular to the seams, like the dashed lines show below:
 Now you once more have six strips, but each strip has three squares. If you then exchange the middle strips from each square, and sew the strips together once more, you’ve got two perfect nine-patch squares:
 Et voilà!
I did this three times, for each combination of the three fabrics. Here are the six nine-patch squares I finished with:
Not shown: Fluffy “helping” by sitting on a quilt block to test its comfy factor. In fact, he sat on fabric anytime I laid it out–from when I first started cutting to the very end. He’s just helpful like that.
As you can see, my “squares” came out a little more rectangular than I had intended, but I actually rather liked that. This is the result of that imprecise measurement I mentioned. I didn’t write down the dimensions I used to cut my strips, but in retrospect, I think I made a mistake in calculating the seam allowances for the long side of the strip, and cut them a little bit longer than I meant to. Thankfully, the nine-patch quilt block is quite forgiving, and therefore very flexible–you can play with different arrangements of fabric, or cutting at different places when you cut up the blocks before exchanging strips (just so long as you exchange strips of equal width between the two blocks). The basic technique is so simple that there are endless ways to play with variations on it. In fact, the nine-patch square serves as a backbone for many more complicated quilt blocks.
As Erin said before, “most of the process [of quilting] is spending long hours cutting, ironing, pinning and stitching,” which I think sums it up quite nicely. The main skill required here is keeping your seam allowances consistent so that the corners of the little squares line up. But even when they’re this simple, there’s something very satisfying about the completion of each quilt block.
Now that I’ve shown how I made the quilt blocks, the next post will be about adding sashing and borders to finish piecing together the quilt top, so stay tuned for even more “cutting, ironing, pinning, and stitching”!
Scraps of love
The pre-Christmas season tends to be a time filled with crafting, as I try to make presents for loved ones. This past Christmas season brought the added challenges of new motherhood to rob me of my time and energy. However, I had one particular project in mind that I was determined to complete. My mother passed away this summer, on June 26, 2013, after battling cancer for the better part of a year. Since then, her absence has left a gaping hole in this family, and it was important to me to remember her with a symbolic gift this Christmas, my first Christmas without her. I rounded up a group of t-shirts that my mother wore religiously and decided to make them into a quilt for her husband, and my step-father, Frank.
Now, my mother was the definition of tom-boy. She rarely wore make-up and I can probably count on my fingers the days I’ve seen her in dresses. As a result, her t-shirt collection was sacred and very well used. Rather than featuring the flowers and unicorns and feminine cuts that admittedly fill my wardrobe, my mother’s t-shirts celebrated things like Cleveland Browns football, Harley Davidson motorcycles and baudy Irish pubs. And I wouldn’t have had it any other way. These t-shirts were threadbare and decorated with all manner of stains, but I think it leant the project even more meaning.
About a month before Christmas I decided that this project needed started (and finished!) to honor both my mother and step-father, but I have never made a quilt, and haven’t really even sewn anything other than a gay-pride-in-the-military “purse” that I fashioned out of army pants and rainbow suspenders and carried throughout my high school career. So, yeah, I wasn’t what they’d call “experienced”.

Josh and I happened to buy an old Brother sewing machine from a garage sale for $2 a couple years earlier. Since then, it sat collecting dust in our attic because, let’s face it, sewing is scary! Thank god for well-rounded, patient husbands, because Josh pulled that old dinosaur sewing machine out of the attic, bought the parts needed to get it running, and sat down with me one cold November evening and taught me to thread the machine and sew scraps of fabric together. Wait, one evening? Try, most evenings for the next four weeks. And with only a month to complete such a big project, I accepted his help in this and many tasks related to this project.
While I still remain a novice sewer (at best!) I found that quilt making, at least in the low form that I was concerned with, is much more about determination than skill. I spent a little time on the internet reading how-to’s and searching for tips, but most of the process is spending long hours cutting, ironing, pinning and stitching.
First, I cut each of the t-shirt fronts (and a few of the backs) into 17″ squares, trying to keep the decal as centered as I could while avoiding seams from the arms or neck of the t-shirt. I bought a cheap fabric cutting kit from a local craft store to aid with the measurements and avoid scratching up my dining room table, and I can’t imagine making all of those cuts with a pair of shears now that I’ve used a rolling-cutter!

After cutting 20 squares for a 4X5 squared quilt, Josh helped me iron a light-weight fusible interfacing to the back of each square. This makes the t-shirts a bit stiffer so they are easier to sew together. With each of the squares prepared, I arranged and re-arranged them on the floor until I found a pattern that I liked. Then, holding two squares together (good side face-in) I pinned and sewed a quarter inch seam to turn 4 squares into a row. Using the same technique, I sewed the 5 rows into the front face of the quilt. Here is the front face all sewn together, with a corner flipped to show the fusible interfacing ironed to the back:

Then I sewed together and cut a rectangle of light batting (the quilt stuffing which comes in yards like fabric), and a rectangle of navy blue fleece for the back of the quilt. I pinned these three layers together (t-shirts in front, batting in middle, fleece in the back) first along the rows, then along the columns to sew the same seams that already existed between the t-shirt squares. It turns out that the thicker the fabric(s) that you are trying to sew, the more challenging. Most of the time when I was sewing these seams together, I felt like I was wrestling a bear. I can’t really explain why, but when I finished sewing along a row I’d be all sweaty and breathless, and Josh and Evee would look up cautiously and ask “Did you make it? How did it go?” as though I was running a marathon. Here’s what it looks like sewing the layers together, and you can see I’ve got clothes pins and chip clips and whatever else I can find to hold the beast together while I run the gauntlet of pounding needles and miles of thread:

You might also note that I have a white dog who’s fur made it all over everything during the process of quilting. Don’t worry though, I washed the whole blanket before I gave it away for Christmas 🙂 Finally, once the body of the quilt was finished, I sewed an edge around the whole quilt out of the same navy blue fleece fabric. This part was pretty finicky and required an ungodly amount of pins:

This in no way produced a fancy, or even technically correct quilt. The squares are too big without enough points of contact between the three layers to ensure that everything stays flat and washes nicely in the machine. However, I only managed to sew the edging on the day before we left for our Christmas travels, so I was out of both time and energy for this project. I do think that quilting patterns or even tacking the layers together would have looked weird over the t-shirt decals, so this will have to be enough. That said, the final project looked respectable and I think Frank (on the left) was pleased to receive the gift:

The whole process was surprisingly time consuming and extremely emotional as I handled the clothes I was so accustomed to seeing my mother wear. There’s also a certain finality about cutting up my mother’s clothes that loomed over me throughout the project. Nevertheless, I’d like to believe that quilting helped me along the grieving process and brought me closer to a place of acceptance and healing. Who knew sewing could do something like that?
