Blog Archives
Fostering Imagination
As a parent, it is my job to teach my children about the world. As a scientist, I believe it is critical to be honest, encouraging education that is straightforward and fact based. I prefer to give full disclosure on tricky subjects such as where babies come from, what hamburger is made of, and what happens when you die. Even when it comes to discipline, I don’t like to cut corners for the sake of avoiding a meltdown. For example, when my toddler is desperate to play for 10 more minutes with the toy train, I won’t fib that the library is about to close. Instead, I tell the truth – it’s late and mama needs to start cooking dinner. Or why tell her that the cookies are all gone when really she isn’t allowed to have another one? That’s delaying inevitable (and important) lessons.
And yet, I believe there is tremendous value in make-believe. I do what I can to show my children that the world is indeed a magical place. Maria Montessori cautioned adults from undervaluing the tinkering and nonsense that young children invest themselves in, explaining that “play is the work of childhood.” Here are a few ways that I try to foster imagination in my 3 year old daughter:
Hiking through the gorges in Ithaca, we cross over many beautiful, old stone bridges each week. I like to remind Evee that trolls live under some bridges, and may demand tolls from people who want to cross. Sometimes my husband or I will pretend to be the troll, and demand a bauble or gesture from Evee such as a flower, pebble or kiss on the cheek. This always gets her giggling, and often ends in requests for the troll to chase her.

Craning to see the troll under the bridge
Evee and I also love to speculate about the magical places where fairies live. When I come across something like a small stone bench, birdbath, or outdoor nook walled in by ivy or a trellis, I tell Evee about how garden fairies are attracted to places like this. We discuss what we can do to cultivate garden fairies in our own yard. Water fairies are hiding in the lush, dripping moss growing around the waterfalls where we hike , and we always squint into the sun trying to catch a glimpse.
Our bedtime chapter book right now is The BFG by Roald Dahl. Last night we read the chapter where the BFG takes Sophie to dream country to catch dreams in his net to bring to children. This morning, Evee listened for the invisible dreams zooming around our backyard. She caught them in her net, and we bottled and labeled the dreams that she caught. For the next few nights, we’ll make a show of releasing one of the good dreams from the jar before she goes to bed. But under no circumstances will we ever release the Trogglehumper, which is a terrifying nightmare.
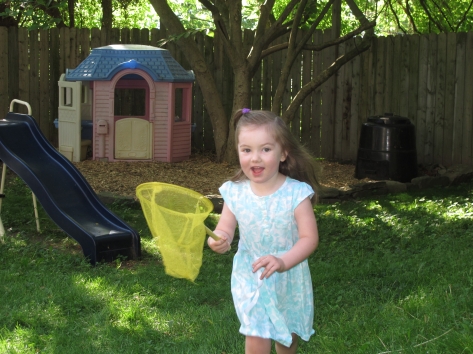
Chasing dreams in the backyard
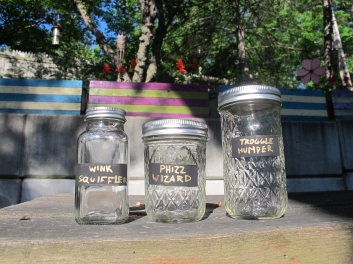
We caught a Winksquiffler, Phizzwizard and even a nefarious Trogglehumper
There’s so much magic in our world that we have yet to discover, and I don’t want my children to close their minds off from any of it. While spending time bartering with trolls may not seem as practical as practicing ABCs or even getting comfortable on her new bike, these exercises in imagination give her the insight and the courage to explore beyond the scope of contemporary knowledge or known science to stumble upon new ideas and hidden wonders. I hope my girls will never outgrow silly, imaginative and magical things like chasing dreams and cultivating fairies.
Evee turns 2!
For posterity’s sake, I thought it would be nice to put a brief description of Evee’s 2nd birthday party up here. We threw her a My Little Pony themed party at my brother’s house in Cleveland. Last year we only had friends at her party in Ithaca, so this year we decided to concentrate on having family there. Of course, most of the foursome made it (thanks Ash and KJ! We missed you Hayl!) and are considered family 🙂 The party started off exactly like Evee’s 1st birthday party, with the star of the show napping instead of greeting guests:

It’s my party, I can nap if I want to.
Josh and I tried to keep to our tradition of making her main gifts. We built this barn together and I painted it. This was built using scrap wood that we bought for <$2 at our local reuse center, and a couple of hinges and screws. Half of the barn roof opens on 2 sets of hinges so clumsy fingers can get inside the barn to play with the animals. As always, I’m so happy to find that we can come up with much higher quality toys for much less than the cost of a new toy by building it ourselves. We bought a tub of plastic farm animals for inside and a few well-sized My Little Pony figurines. She was in seventh heaven 🙂

A simple, sturdy barn made by Mom and Dad
I also crocheted her a cute little Doctor’s kit bag to replace the crappy plastic one that came with the Doctor’s kit she received for Christmas. The plastic one became completely unusable after she stepped on it a few times, but I imagine this one will last her a while!
The talented Miss (not-Miss-for-long) Ashley created her My Little Pony themed birthday cake from scratch, and it was definitely the hit of the party. Two layers of chocolate cake with chocolate ganache between them, and yummy homemade frosting made for a delicious birthday treat! She also made some awesome rainbow cupcakes using more of that chocolate ganache as frosting 🙂

The gorgeous, homemade cake 🙂
Evee had a wonderful time opening gifts, eating cake and playing with her cousins Lily and Ryan. Josh and I bought her a twin bed to transition into from the crib, and the My Little Pony plushies and bedding made it into a toddler paradise. After the transition, she went from never sleeping through the night to now sleeping through the night more than 50% of the time (with only one wake-up on nights that she does get up). So it was a happy birthday for me, too!

Toddler squee 🙂
When life hands you snow… make snow cones
Alright, I consider myself a Northern girl through and through. I love the snow and the cold, shoveling, skiing, snowmen, the whole bit. But this has been the worst winter ever with feet upon feet of snow, no melting, and unbearable bitter cold.

The cheerful snowman we built a few weeks ago has been buried alive
We’ve received so many National Weather Service announcements that today’s warning of wind chills in the -30’s and risk of frostbite in minutes just feels like a routine weather report.

My city has literally given up on attracting tourists – our website now redirects them to Key West instead
With a 1-year-old at home and no feasible way to go outside, the whole family has developed a pretty serious case of cabin fever. So this week, I decided it’s time to make something good out of all of this mess. A couple of days ago, I brought in a big tray of snow (like everyone else, I have obscenely large piles of pristine snow covering my yard and patio). Evee and I played in it, measuring and scooping and tossing our snow creations around the kitchen floor. We made mini snowmen using a gingerbread cookie cutter. But Evee’s favorite activity? Eating it. I bet no one saw that coming 😉
So this gave me an idea. Eating snow on its own is plenty of fun, but let’s face it, the real novelty wore off a few months ago. But how about making snow cones? Those are probably my favorite carnival treat, and snow cones have such a tropical, summery feel that they’re sure to chase away some of our winter blues. So I asked the internet whether it’s ok to eat snow and was assured that it was safe, as long as you use common sense and steer away from obviously polluted patches.
Next I wondered where I could get snow cone syrup, and I found out that you can buy it in gallon jugs for just a few bucks from Amazon, etc. But that’s not my style. So I went to the grocery store, bought a few classic packets of Kool-Aid, and we made snow cones!

If only we had those little umbrellas…
I just made a simple syrup on the stovetop (1 cup sugar, 1 cup water, bring to a boil) and added a packet of Kool-Aid. I didn’t do any googling, but I would bet that there are more sophisticated recipes out there. I happened to have a squirt bottle lying around the house which worked perfectly for syrup application. I grabbed a bucketful of pristine snow, filled everyone’s glasses and squirted some syrup on top. It was that simple. The results were quite tasty and everyone had a lot of fun.

Snow cones in the dead of winter help revive that long-lost summer feeling
Bring it on, winter!
Keepin’ it real on Valentine’s Day
At 16 weeks pregnant and caring for a toddler, I’m not really full of energy these days. But that doesn’t mean we can’t get Evee excited about Valentine’s Day! So here are some Do’s and Don’ts about keeping it real on Valentine’s Day without making yourself crazy:
- DON’T be afraid to buy those store-bought valentines! Kids love seeing their favorite characters, so if you don’t have the mojo to hand craft valentines (I sure didn’t) they are hardly going to be disappointed.
- DO be realistic about any creating / crafting you want to do for the holiday, and if you need supplies, buy them the week before. We literally just stuck My Little Pony valentines to a plastic baggy with a heart-shaped rice krispy treat inside. Rice krispy treats take, what, 5 minutes to make? Add another 5-10 minutes if you want to futz around with a heart-shaped cookie cutter (or just cut them into squares because the kids are going to be so busy wolfing them down they will have no idea that the treats have a special shape). BTW, toddlers are excellent at rice krispy treat preparation – or at least at devouring marshmallows, licking the stirring spoon and commenting loudly on every part of the process.

Rice Krispy Treats are a no-fuss way to turn valentines into a toddler win!
- DON’T wait until 8:30pm the night before (i.e. 30 minutes before bedtime) before remembering you’ve got to make valentines for the next day. Or actually, since your valentines are going to be so low-key, it’s actually ok to do this 😉
- DO get your child super excited about whatever you’re doing and let them participate in the activities / valentine construction. They will be WAY more excited to give out valentines that they had a hand in creating!
- DON’T post pictures of 30 gorgeous, homemade valentines that there is no way your preschooler could have possibly helped make on Facebook, bragging about how it took you 4 nights of work while battling a stomach flu. It’s ok to be proud of your accomplishments but you don’t want to cross enemy lines into the pinterest-mommy-battle-arena.

Now this is the face of a girl who is excited to bring her valentines to daycare!
Other than that, we prepped for the holiday by making some gorgeous dried pasta necklaces a few nights before. Evee clumsily used a paintbrush to smear acrylic on dried noodles. She also got acrylic all over herself, but since we only let naked toddlers use paint, clean-up took about 2 minutes. We went out to dinner with some friends, and by the time we got back, the paint was dry and the noodles were ready to string into necklaces! Then we all got to strut around like gorgeous rockstars in our new jewelry all night. Even Princess Daddy sported a pasta necklace. This was an easy, quick hit.

This yarn might as well be holding the goddamned hope diamond, for as proud as Evee was to wear it.
Last but not least, we have an awesome Valentine’s Day date night planned with the whole foursome at Americana Vineyards. You can’t beat that!!!
Scraps of love
The pre-Christmas season tends to be a time filled with crafting, as I try to make presents for loved ones. This past Christmas season brought the added challenges of new motherhood to rob me of my time and energy. However, I had one particular project in mind that I was determined to complete. My mother passed away this summer, on June 26, 2013, after battling cancer for the better part of a year. Since then, her absence has left a gaping hole in this family, and it was important to me to remember her with a symbolic gift this Christmas, my first Christmas without her. I rounded up a group of t-shirts that my mother wore religiously and decided to make them into a quilt for her husband, and my step-father, Frank.
Now, my mother was the definition of tom-boy. She rarely wore make-up and I can probably count on my fingers the days I’ve seen her in dresses. As a result, her t-shirt collection was sacred and very well used. Rather than featuring the flowers and unicorns and feminine cuts that admittedly fill my wardrobe, my mother’s t-shirts celebrated things like Cleveland Browns football, Harley Davidson motorcycles and baudy Irish pubs. And I wouldn’t have had it any other way. These t-shirts were threadbare and decorated with all manner of stains, but I think it leant the project even more meaning.
About a month before Christmas I decided that this project needed started (and finished!) to honor both my mother and step-father, but I have never made a quilt, and haven’t really even sewn anything other than a gay-pride-in-the-military “purse” that I fashioned out of army pants and rainbow suspenders and carried throughout my high school career. So, yeah, I wasn’t what they’d call “experienced”.

Josh and I happened to buy an old Brother sewing machine from a garage sale for $2 a couple years earlier. Since then, it sat collecting dust in our attic because, let’s face it, sewing is scary! Thank god for well-rounded, patient husbands, because Josh pulled that old dinosaur sewing machine out of the attic, bought the parts needed to get it running, and sat down with me one cold November evening and taught me to thread the machine and sew scraps of fabric together. Wait, one evening? Try, most evenings for the next four weeks. And with only a month to complete such a big project, I accepted his help in this and many tasks related to this project.
While I still remain a novice sewer (at best!) I found that quilt making, at least in the low form that I was concerned with, is much more about determination than skill. I spent a little time on the internet reading how-to’s and searching for tips, but most of the process is spending long hours cutting, ironing, pinning and stitching.
First, I cut each of the t-shirt fronts (and a few of the backs) into 17″ squares, trying to keep the decal as centered as I could while avoiding seams from the arms or neck of the t-shirt. I bought a cheap fabric cutting kit from a local craft store to aid with the measurements and avoid scratching up my dining room table, and I can’t imagine making all of those cuts with a pair of shears now that I’ve used a rolling-cutter!

After cutting 20 squares for a 4X5 squared quilt, Josh helped me iron a light-weight fusible interfacing to the back of each square. This makes the t-shirts a bit stiffer so they are easier to sew together. With each of the squares prepared, I arranged and re-arranged them on the floor until I found a pattern that I liked. Then, holding two squares together (good side face-in) I pinned and sewed a quarter inch seam to turn 4 squares into a row. Using the same technique, I sewed the 5 rows into the front face of the quilt. Here is the front face all sewn together, with a corner flipped to show the fusible interfacing ironed to the back:

Then I sewed together and cut a rectangle of light batting (the quilt stuffing which comes in yards like fabric), and a rectangle of navy blue fleece for the back of the quilt. I pinned these three layers together (t-shirts in front, batting in middle, fleece in the back) first along the rows, then along the columns to sew the same seams that already existed between the t-shirt squares. It turns out that the thicker the fabric(s) that you are trying to sew, the more challenging. Most of the time when I was sewing these seams together, I felt like I was wrestling a bear. I can’t really explain why, but when I finished sewing along a row I’d be all sweaty and breathless, and Josh and Evee would look up cautiously and ask “Did you make it? How did it go?” as though I was running a marathon. Here’s what it looks like sewing the layers together, and you can see I’ve got clothes pins and chip clips and whatever else I can find to hold the beast together while I run the gauntlet of pounding needles and miles of thread:

You might also note that I have a white dog who’s fur made it all over everything during the process of quilting. Don’t worry though, I washed the whole blanket before I gave it away for Christmas 🙂 Finally, once the body of the quilt was finished, I sewed an edge around the whole quilt out of the same navy blue fleece fabric. This part was pretty finicky and required an ungodly amount of pins:

This in no way produced a fancy, or even technically correct quilt. The squares are too big without enough points of contact between the three layers to ensure that everything stays flat and washes nicely in the machine. However, I only managed to sew the edging on the day before we left for our Christmas travels, so I was out of both time and energy for this project. I do think that quilting patterns or even tacking the layers together would have looked weird over the t-shirt decals, so this will have to be enough. That said, the final project looked respectable and I think Frank (on the left) was pleased to receive the gift:

The whole process was surprisingly time consuming and extremely emotional as I handled the clothes I was so accustomed to seeing my mother wear. There’s also a certain finality about cutting up my mother’s clothes that loomed over me throughout the project. Nevertheless, I’d like to believe that quilting helped me along the grieving process and brought me closer to a place of acceptance and healing. Who knew sewing could do something like that?
Hayl’s First Crochet Project
It was Super Bowl Sunday, junior year of college. I knew the rest of campus was entirely devoted to watching the game. It would be on every TV in every dining hall and common area. Everyone would be watching.
Me? I was secluded in a friend’s dorm room, with a J-sized crochet hook I’d bought the day before, learning how to chain, single, and double crochet from my friend, Kristen.
Kristen, a somewhat experienced crocheter at this point, was beginning a new afghan, and so my first crochet project was an afghan of the exact same pattern:

The pattern is called “Light & Lacy Afghan,” is a free pattern that came on the label of Mainstays yarn (Wal-Mart’s brand; it has since been discontinued), and is actually a really lovely pattern. When I show people my finished afghan, they are immediately impressed that it was the first thing I made–it looks fancy, but is actually quite simple, using only basic stitches and a three-row repeat that’s easy to follow. (The pattern has been reproduced here, and for those of you on Ravelry, you can check it out here.)
I purchased blue variegated Mainstays yarn for the project. (Mainstays is about on par in quality with Red Heart Super Saver. This type of yarn is perfect for first projects–ie, it’s really cheap, and great for that one thing you’ll hang onto forever and cherish because it was your FIRST, no matter how ugly or rough it is–but every knitter or crocheter should very quickly arrive at the point where they shudder to buy the stuff.)
I learned some important lessons while working on this project. First was the all-important rule about the tension you hold your yarn at. Kristen noted right away that I was a very tight crocheter. (This was partially because I was still figuring it out, and partially just natural to me.) A few days or weeks later, I informed her that I’d managed to correct that and my stitches were much looser now. Instead of complimenting me, she winced! And then proceeded to teach me why it was important to maintain a consistent tension throughout a project.
As a result, if you lay out my finished blanket on the floor, you’ll notice that one edge has the narrowest width, then gets MUCH wider, and towards the other end gradually narrows somewhat again (as I tried to compensate for my mistake). Like every first crochet project, the dimensions are wonky. Starting with an afghan, instead of a scarf like most people, actually works to my advantage here, because folded up and thrown over the back of the couch, no one can ever tell!
Here’s my finished afghan:

(Oh, dorm room days. I do not miss thee.)
The second important lesson I learned was about dye lot. What I hadn’t known was that every skein of yarn has a little number printed somewhere on the label, that indicates what batch in the factory it comes from. The first time I switched skeins, there were no issues. The second time I switched skeins, after I had crocheted a few rows it was very obvious that the new skein was quite a bit darker than the others. You could see a line where the color changed, exactly where I had switched over. Not good. I ripped out those rows, went back to buy some new skeins that matched better, and continued.
(I still have two skeins from the darker lot that I’ve never used. This was the beginning of what’s affectionately, or sometimes fearfully, referred to by knitters and crocheters as my “stash.”)
Here’s a close-up:

I know now that I was also doing something very weird with some of my double-crochets, which makes the pattern not quite as defined as it’s supposed to be. For comparison, here’s a close-up of a Ravelry user’s version:

Here’s the thing about mistakes, though: no one knows what it’s “supposed” to look like except YOU. As my first project, this is in permanent rotation as one of our couch throws, and even if I look at it and see all my mistakes, I get compliments about it all the time from other people!
